For baseball and softball players, regular batting practice is essential for developing consistent mechanics, hand-eye coordination, and improving power. While commercial batting cages or hitting lessons can be effective, they are often expensive and inconvenient. Building a backyard batting cage provides a convenient alternative that allows you to train on your schedule without having to make continuous payments beyond the initial investment.
The Short Answer: Setting up a backyard batting cage involves selecting an ideal location, constructing a sturdy frame, installing durable netting, and adding finishing touches like pitching machines and hitting mats. While it requires some time and effort, it’s a rewarding project that can transform your backyard into a personal training space.
Laying the Groundwork
Choosing the Perfect Location
Before building your batting cage, selecting the right spot in your backyard is crucial. Look for a flat, open area with enough space to accommodate the length of the cage. Typically 40-70 feet long, 10 feet wide, and 10 feet high for most backyard setups. Make sure the location is free from obstructions like trees, fences, or power lines. Take into account your neighbors and local regulations regarding noise and construction.
Preparing the Area
Once you’ve identified the spot, prepare the ground. A solid base is necessary for stability, especially for outdoor batting cages exposed to wind and weather. A concrete base is ideal for long-term durability, but compacted dirt or turf can also work for temporary setups. Mark the post-hole locations where the batting cage frame will stand. Use stakes and string to ensure the layout is straight and square. Double-check measurements to ensure your cage fits comfortably within your space.
Building the Batting Cage Frame
What are the Best Materials to Use?
The frame forms the backbone of your batting cage, so strength and durability are key. Materials like Kee Klamp fittings, galvanized steel pipes, or sturdy PVC pipes are popular options. For a more cost-effective approach, you can use treated wood posts. However, we highly recommend using metal poles instead of lumber for your batting cage. Metal poles are more durable, resist warping and bending, and can withstand the elements far better than wood. While wood may be less expensive initially, it is prone to damage over time, such as warping, bending, or attracting termites. Metal poles also provide a sleeker, more professional appearance, especially when painted or powder-coated black, making them a superior choice for both longevity and aesthetics.
Choosing Steel Poles
When choosing steel poles for your batting cage, you’ll run into a decision between Schedule 40 and Schedule 10 pipes. Schedule 40 pipes have thicker walls, a smaller internal diameter, and weigh about 7.5 pounds per foot. These are commonly used for gas and water lines. On the other hand, Schedule 10 pipes have thinner walls, a larger internal diameter, and weigh approximately 4.5 pounds per foot, making them ideal for lower-pressure applications. For batting cage poles, Schedule 10 is generally the better option due to its lighter weight and cost-effectiveness. While Schedule 40 pipes can work, they are heavier and more expensive, which might not be ideal for a backyard setup.
The most common size pole for batting cages is 3 inches in diameter and 12 feet in length. A 2-inch diameter pole is too thin to provide adequate support, while poles larger than 3 inches are unnecessary. The 12-foot length works perfectly with standard batting cage nets, which are typically 10 feet high, leaving 2 feet of the pole to be buried in concrete for stability. If you plan to use a custom net taller than 10 feet, you’ll need longer poles to accommodate the extra height.
- Kee Klamp fittings: Provide excellent tensile strength and are ideal for long-term use.
- Fence posts: An old-school batting cage option that’s both affordable and sturdy.
- Galvanized steel pipes: Durable and resistant to weather damage.
You can source these materials at your local hardware store or online retailers specializing in DIY batting cages.
GET STARTED WITH WIN REALITYAssembling the Frame
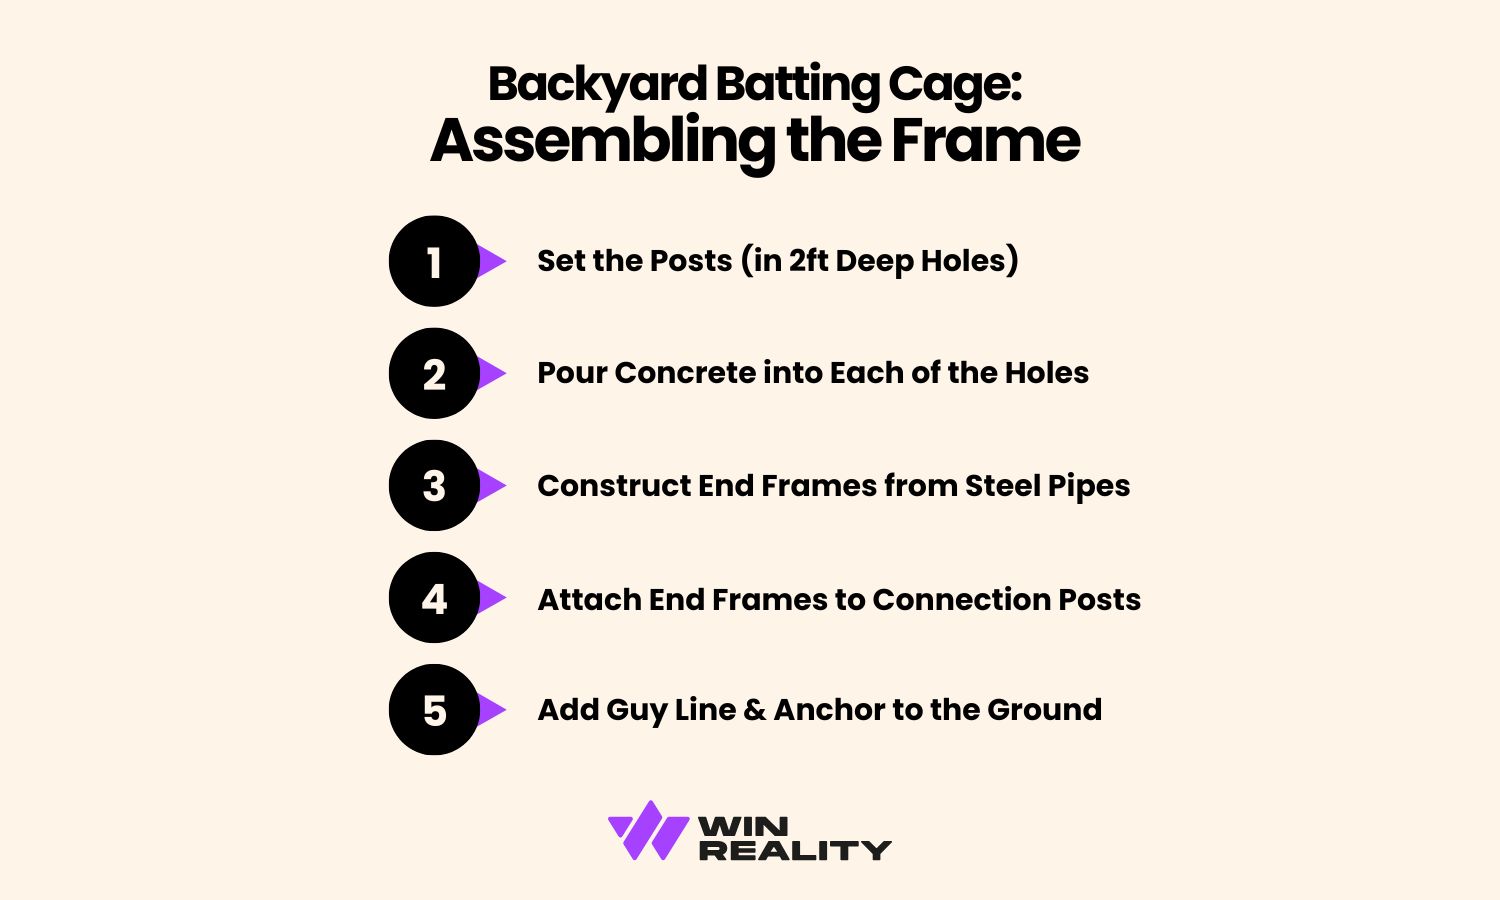
- Setting posts: Dig up holes that are at least 2 feet deep for every post that will be set into the ground.
- Concrete Base: If using a concrete base, set the posts in those pre-dug holes then fill them with concrete for maximum stability. Allow 24-48 hours for the concrete to cure before proceeding.
- End Frames: Start by constructing the two end frames. These will support the entire structure, so ensure they are sturdy. Use T-joint or Kee Klamp fittings to connect horizontal and vertical pipes or posts.
- Connecting Posts: Install horizontal posts to connect the end frames. These will act as the top and bottom supports for your netting.
- Guy Lines and Anchors: Add guy lines to stabilize the structure and prevent swaying during windy conditions. Anchor the lines securely to the ground with stakes.
Pro Tip: Use a level during assembly to ensure all components are straight and aligned.
Netting, Finishing Touches, & Alternatives
Installing the Batting Cage Net
Once the frame is complete, it’s time to attach the netting. Measure your frame’s dimensions to ensure the batting cage net fits properly. Use durable materials like nylon or polyethylene nets, which have high tensile strength and can withstand repeated impacts from baseballs or softballs.
- Measuring and Cutting: Lay out the netting on the ground and cut it to size if necessary.
- Installing the Net: Secure the net to the frame using zip ties, cable ties, or carabiners. Start at the top and work your way down to ensure even coverage.
- Installing End Caps and Padding: Add end caps and padding to the frame’s exposed edges for safety and a polished look.
Adding Finishing Touches
- Pitching Machines: Enhance your batting practice with a pitching machine. Check out our blog on the best pitching machines for recommendations.
- Guy Wires: Reinforce the cage with additional guy wires to keep the structure stable.
- Turf or Mats: Install a turf or batting mat at home plate to protect the ground and ensure a consistent surface for hitters.
- L-screen: Use an L-screen to protect the person throwing or feeding the pitching machine.
Exploring Alternatives
Building a batting cage from scratch can be a fulfilling project, but it’s not for everyone. For those seeking a quicker solution, consider pre-made backyard batting cage kits. These commercial options save time and effort but come at a higher cost. Check out our blog for the best batting cage options. Before committing to building a batting cage, weigh the costs and benefits of each option.
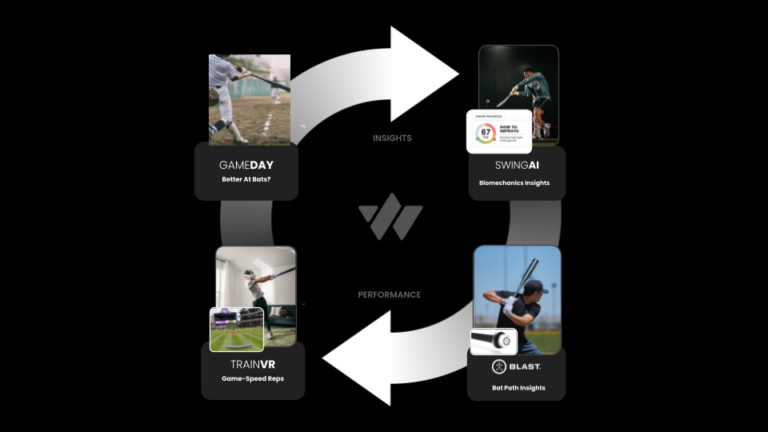
The Revolutionary Alternative: WIN Reality
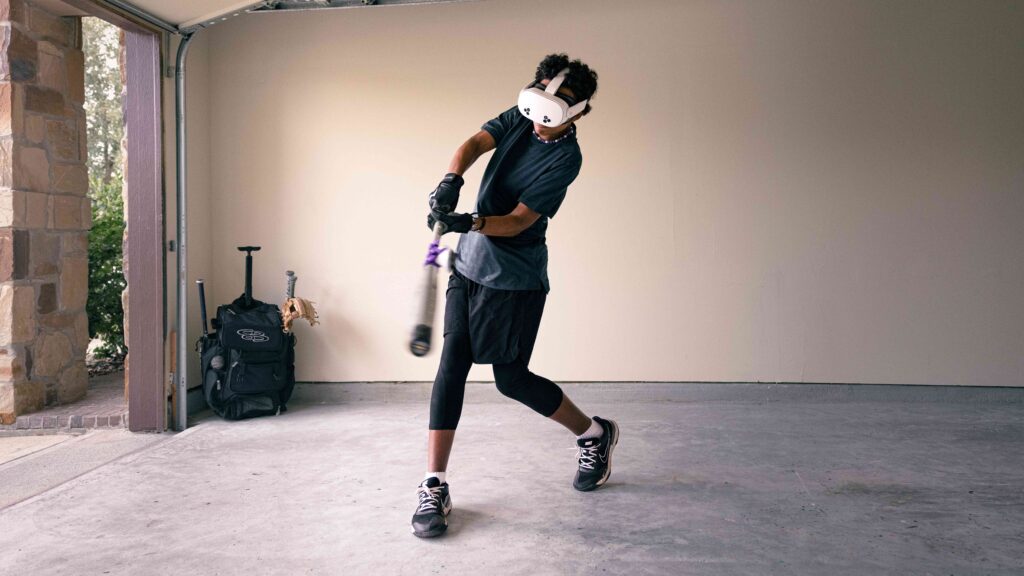
Consistent practice is essential for improvement, and batting practice is a great way for hitters to enhance their skills. Typically, this takes place in batting cages, where players can have traditional batting practice and work on their ability to make solid contact with the ball. While batting cages are invaluable, they have limitations. They’re stationary, require maintenance, and can’t simulate game-speed conditions or pitch variety. On top of that, unless you are hitting off the tee or have a ball feeder, you also would need someone to practice with you. That’s where WIN Reality comes in.

WIN Reality’s VR Baseball Training Platform creates an immersive environment that simulates real-game scenarios. Players can face game-speed pitches, practice their swing, and improve their swing decisions and timing from the comfort of their homes. Unlike a batting cage, WIN Reality offers unparalleled analytics, including barrel speed and biomechanics, as well as metrics on timing and swing decisions.
Advantages Over Traditional Cages
- Cost and Maintenance: A backyard batting cage requires a significant initial investment and ongoing upkeep. WIN Reality eliminates these costs while offering more dynamic training.
- Game-Like Training: With WIN Reality, players experience live pitch speeds and face real pitchers, making it perfect for training timing, recognizing pitch types, and improving swing decisions.
- Analytics: The mobile app tracks performance, allowing hitters to identify their strengths and areas for improvement while monitoring progress over time.
- Biomechanics: WIN Reality provides detailed biomechanical reports that highlight the most efficient swing mechanics for players. By analyzing key components of the swing, such as pelvis load and the forward move, these insights help position players to maximize their swing potential and overall performance.
By combining WIN Reality’s technology with traditional training methods, players can accelerate their development, making it a game-changing tool for baseball and softball players.
Ready to revolutionize your training? Explore WIN Reality’s pricing bundles today to unlock the future of baseball and softball practice.
GET STARTED WITH WIN REALITY